Taking screenshots become quite handy for any work purposes. Especially when you write a tutorial article or prepare a presentation, screenshots are very much necessary. As a matter of fact, screenshots are usually taken on your PC when any picture does not show up with save options. If you are still thinking how to take a screenshot on Windows 10 PC or laptop then we have a perfect guide for you. With the guidelines given below you can perfectly take screenshots within no time. With the help of this screen shot you can capture any image that you wanted.
However there are many methods or ways to capture screen on Windows 10. This will help in many ways, like covering up the whole writing of your article by giving examples with images or for some important presentation. Methods like snipping tool, various button shortcuts, print screen and many other third- party tools are available for taking screenshot on Windows 10. Read the methods that we will be adding below and without any hassle you can try the alternatives ways of capturing image. If you are damn sure that you need these techniques then get looking below all the entire ways.
Also check: Download Garageband for Windows 10
How to Take a Screenshot on Windows 10:
There are several ways to take a screenshot on your Windows 10. Let’s have a quick look on the methods and in case if you are still confuse we have also provided you a step by step guide. Have a look and make sure you follow the steps diligently.
Method 1: How to Take a Screenshot on Windows 10 PC or Laptop Using Snipping Tool?
If you are a user of Windows 10 then easily you can take a screenshot with the help of Windows 10 snipping tool. This is a tool that first includes in Windows Vista and this is the easiest way to capture anything from the PC or Laptop screen. You can also bookmark for shortcut folder.
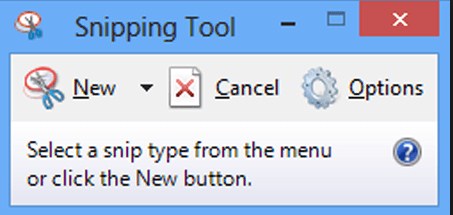
- First, visit the Start button of your Windows 10 and there will be search bar where you need to type “snipping tool”.
- Snipping Tool icon will appear on the search results, hit on the icon.Now we hope you could see a snipping tool that appears in a rectangular size at the middle of the screen.
- There are three options available in this tool which includes New, Cancel and Options. If you are thinking to take a screenshot and capture the image then click on the new button.
- Besides that button you will find an option to customize the whole shape of your image either you can choose Free from Rectangular Snip, Window Snip, Snip or Full-Screen Snip. Click on any options and start dragging the cursor to take a snip.
- After dragging click on the File option and search for save as button. Now you can locate the file on your PC in any location as you like.
Method 2: How to Take a Screenshot on Windows 10 Using PrtSc Key On The Keyboard?
In any case when you have miss out taking a screenshot with Snipping tool in Windows 10 then with the help of PrtScr easily take you can take screenshot. For the first time when you tap on the keyboard PrtSc you will find as if nothing has happened but indirectly it has been already saved in the folders. Check out the steps given below;
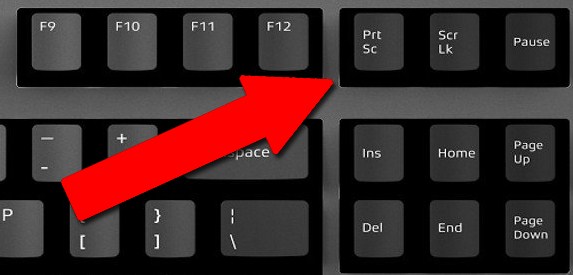
At first make sure you press both keys together that are Windows key+ PrtSc on your PC or Laptop. However, in some of the laptops you have press Windows key+ Ctrl+ PrtSc all together. Some of the laptop keys don’t have direct access to PrtSc so you have to press windows Key+ Fn+ PrtSc.
The moment you press the required result automatically screen will dimmer for seconds which means screenshot has already been saved. But remember that it is a full screenshot image.
You will get this screenshot image when you visit pictures of your own files and folders.
Method 3: How To Take a Screenshot With The Help of Chrome Extension?
With the help of Screenshot tool you can easily capture the part of the image as how you wanted or even you can take a full-screen shot. Have a look on the steps;

- In order to take a screenshot firstly install the Screenshot tool in your Chrome Extension.
- Now you can easily press Ctrl+ Shift+ S all together then instantly grey dimming will appear.
- It is the time to drag your cursor at to which point would you like to capture the screen.
- Now click on the Capture button and automatically you will be able to save the picture in your required location.
Method 4: How to Take a Screenshot Without Saving?
This method is a bit tricky, but it saves your image instantly. Follow the procedure that we have attached below:
- At first, make sure you press the PrtSc option key provided on your keyboard. Automatically the display that you are viewing will be automatically saved on your clipboard.
- For instance, open Word Processor and choose the option Edit followed by paste screenshot. Do not worry the dimension and resolution of the image as it will remain the same.
- This way you can complete to take a screenshot on Windows 10.
Method 5: How to Take a Screenshot Using Snagit?

In actual Snagit is a screenshot tool that captures video display and many other images. As this is an alternative to Print Screen now you can totally capture the image that you like. This is a quick tool bar for quick capture of photos. However, even if you are in a hurry easily you can screenshot within no time. You can download the tool bar on your Windows 10 from the official website. Do not worries you do not require any credit card to download the file.
Method 6: How to Take a Screenshot Using Windows Key+ H:
For capturing your all over screen another alternative ways to screenshot is by pressing Windows Key+ H. With the help of this shortcut, you can easily capture your full screen without any issue. With the help of this method, instantly a windows sharing tool bar will be visible for sharing with your friends through Facebook, Twitter etc.
Method 7: Ways to Take Screenshot in Windows 10 using Snip Editor:
Snip Editor is another screen shot utility tool that works more far better than Snipping tool. This Microsoft Garage project lets you to take screenshots of the entire screen within no time. However, you can also take rectangular image or an active full screen window. For any shortcut to this tool you can create settings of the PrtSc key.
Method 8: Ways to Take Screenshot using Windows Key+ Volume Down:
Some of the tablets have a volume rocker on the sides. Windows Surface device is such kind of tablet that helps you to capture image with the help of Windows Key+ Volume Down. Therefore follow the steps mentioned below;
- To start the process first hold the Windows Key+ Volume down, this is located on the side of your tablet.
- You will see the screen getting dimmed and eventually your screenshot will be saved in your pictures folder followed by screenshot icon.
Conclusion
The above mentioned are the methods on how to take a screenshot on Windows 10. So, if you are not much familiar with one step then you can check the other alternative ways. This way you can finally cover up your works and use the image for work purpose. However, you can also send those captured image to your friend via email or to any social media chat. We have mentioned the best 8 methods to capture screen in Windows 10. We hope you got the solution for screenshot in Windows 10. However, if you are still having issues to use the above techniques then help us through the comment section.